• About
  • Contact

House of Turquoise

and teal, robins egg blue, aqua, sky blue, seafoam green, and ocean blue

  • HOME
  • ROOMS
    • Living Room
    • Kitchen
    • Dining Room
    • Bathroom
    • Bedroom
      • Nursery
      • Kids Room
      • Teen Room
    • Office
    • Outdoors
      • Porches
  • Paint Colors
  • Get the Look
  • Shop

Guest Blogger: Helen of Seaside Interiors

May 9, 2013

Hello House of Turquoise Readers, I’m Helen.

I am the lucky lady who gets to do a guest post today!

I am also the lady who has been bugging her husband and friends about how excited I am to have the chance to do this again, so thanks Erin for having me back!

What are my guest blogger qualifications you might ask?

 Well first, I stalk visit House of Turquoise on a daily basis for my inspiration kick!

And Second, I love the color turquoise and use it a lot when decorating.

Those are the two most important qualifications, right?  πŸ˜‰

Umm, let’s see, I created my blog A Brit of Happiness  over a year ago and I took the plunge this past year and started up my interior decorating business  Seaside Interiors.  Since I started, I have had a blast creating Online Design Boards and decorating homes for my clients.

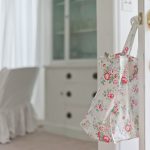
Today I want to share with you one of the room installations that I recently created for a client. I think my favorite type of install is the ones where I go in and complete an entire room start to finish in one go.  There is something about that type of process that I really enjoy. 

My clients wanted a slightly formal living room with a contemporary vibe. Some touches of green and shades of blue and turquoise.  They wanted something that was Relaxing and playful!  Which pretty much describes their family.
We will start backwards and work our way to the beginning, which pretty much describes me πŸ˜‰
Here is the formal/contemporary/casual living room I created…

I brought the room together using a design board that I created for the clients.
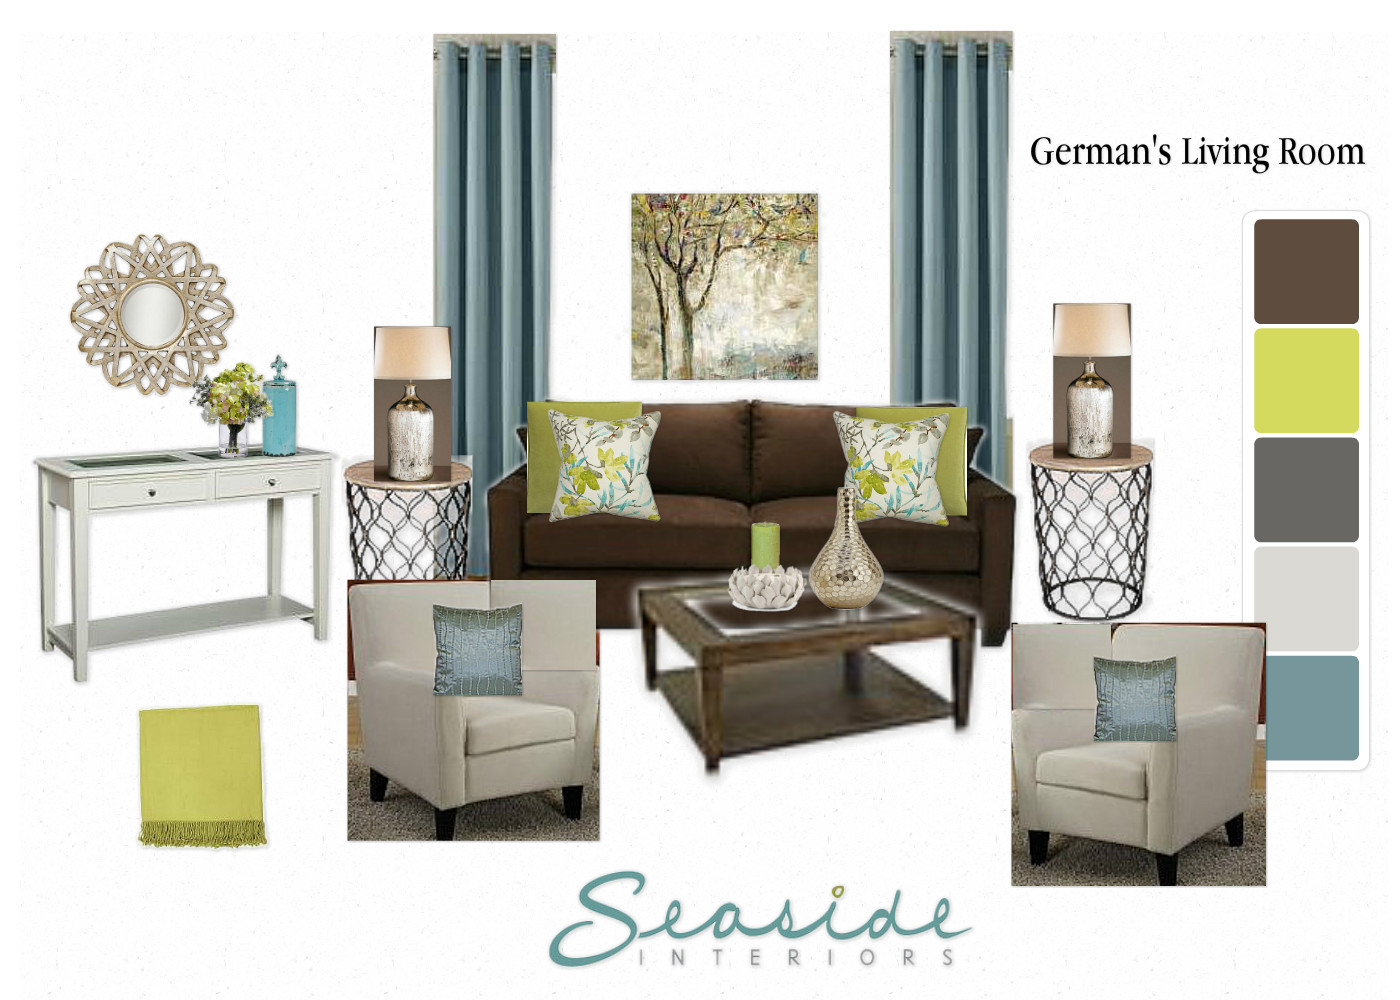
These are the design boards that I create for my online and local clients.  Creating a design board for a room always helps to see how everything comes together. 
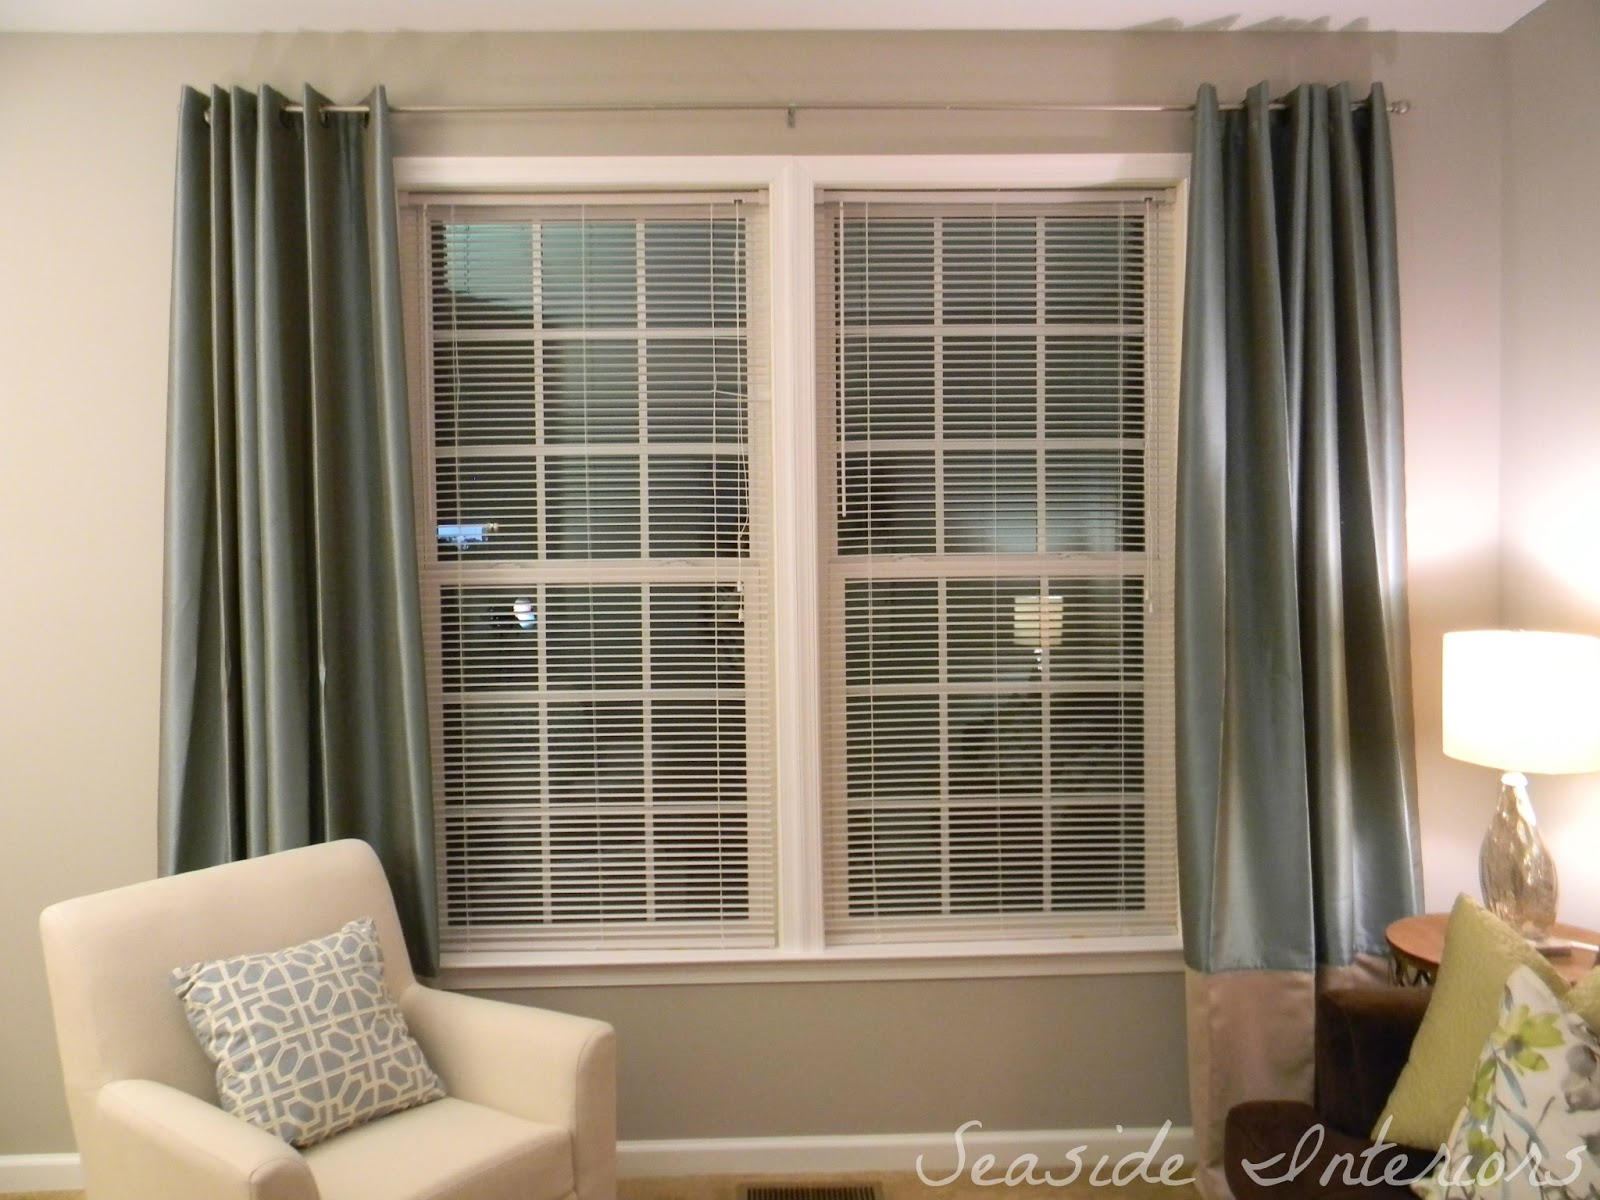
 P.S. Don’t be scared of the green on the Design Board, it sorta showed up just a SMIDGEN brighter online than I was expecting.
WANNA SEE MORE?  Oh K!!!
Yummy gorgeous curtains!!  I went with a really pretty steal blue top and a caramel colored bottom.  I made sure to measure exactly from floor to sill for where I wanted the caramel color to reach.  Notice how the rod extends further past the window so the curtains don’t cover the window and it actually makes the window feel much larger.
 A perfect spot to just curl up on the couch! 
Working with the client’s budget, I knew we would be able to splurge on a few key pieces and then have to find deals on the rest.  I say splurge where it counts.  Accent pieces are easy to pick up here and there for a bargain.   Put the bulk of your money on bigger items such as furniture.  Since the clients already had the brown couch, I was able to spend a bit more on other items such as the creamy linen club chairs and the fabric. 
Even though the coffee table and side table are different, they still have enough of the same elements to bring them together without having them match exactly.  Kind of like a couple on a first date.  Both are two toned and both are metal and wood.  The tables, not the couple, lol. So they go together well.
This is one of the two linen club chairs I brought into the room.  It is a great spot to sit and relax and it gives more seating options for having family and friends over for a visit.
When I am working with a darker piece of furniture such as the deep brown couch, I try to work in a lot of lighter touches like the pillows and artwork. 
Bringing in the shiny hammered based lamps adds another layer to the room.  Without them, the room would feel very flat.  I also add in at least one other shiny element so that the lamps don’t stand on their own.  They need a little company.  For the other shimmery piece, I added the really pretty mirror above the unit to connect both pieces.
Here is the glass bowl I found to go on the coffee table.  This is my artsy fartsy way of taking a picture.  I figured all of the amazing photographers take cool close ups, so I better take one too.  One day I will hire a professional photographer to come in and take some real artsy fartsy shots.  For now, I will keep dreamin.
To go underneath the mirror, I chose this blue gray glass front cabinet.  It fits the space really well by filling up this smaller angled wall.
 
Just a few goodies to go in the cabinet to bring more texture to the room.
 I fell in love with this fabric!   I used it as my base to pick other items in the room such as the wall color.  A little touch of turquoise in the pillows finishes it off.
Now you know what the end result looks like, let’s take a look at how we got started yesterday.
When we arrived, all we had to do was remove the existing brown couch while we painted.  So we were left with a complete blank slate.
Let’s take a quick pause.  This is my hubby Dustin a.k.a. The Very Meticulous Wall Sander.  He has his own paint business and he is just as much of a perfectionist as I am when it comes to a job.  We also work really well together on projects so I love having him around.

Ok, we can unpause now πŸ˜‰

Once the couch was out of the room, we got to work on painting. 
One of the first steps was to sand the walls down just to smooth your surface out before you begin painting.
While Dustin sanded, I got the frog tape and taped off all of the trim work.  
 After he was done sanding, he got the paint ready.  The color I chose for the walls is Requisite Gray by Sherwin Williams.
 Here is a closer shot of Requisite Gray, which doesn’t really look like that once it is dry on the walls.  I’ll show you shortly. 
While Dustin was painting the ceiling a flat white, I utilized the client’s dining room to bring in all of my dΓ©cor for the living room.
Getting everything together in one room allows me to pick and choose how I want it to go into the room and if I need to add anything or take anything away.  I also do this same add and take away deal when I complete the room. 
Once all the accessories where gathered, I headed back in to assist with the first coat of paint.
Dustin worked on the top while I took care of the bottom trim.
Extreme close up of Dustin’s expert lines πŸ˜‰  That’s why I stay to the bottom where the frog tape is!
 In comes the rolling of the first coat.
Once you are done with the first coat, let it dry for a bit.  Go grab some lunch and come back and then comes the fun part.  Do the SAME EXACT THING all over again.  Yay!
After the second coat of paint is dry, we started putting the room together…
Time for some furniture.
  I love the detail work on the end tables!  It has a pretty quatrefoil pattern with a sort of green patina finish.
Here I am having a special moment with the lamp!  You don’t talk to your furniture and accessories?  No me either πŸ˜‰
 Here is the end result one more time…
I hope you liked the start to finish or finish to start of the room transformation!
I love getting comments and feedback, so if you get a chance, I’d love to hear what you think of the makeover.
Thanks for taking the time to read my post and thanks again Erin for allowing me to be a guest blogger!!
(P.S. Visit Helen over at her blog here!)

Love turquoise? Visit my shopping blog Everything Turquoise…updated several times throughout the day! Check out Decor by Color for even more color-themed shopping!

Related Posts

  • Guest Blogger: Megan from The Homes I Have MadeGuest Blogger: Megan from The Homes I Have Made
  • Guest Blogger: Kristy from Wicks NestGuest Blogger: Kristy from Wicks Nest
  • Guest Blogger: Kristie from The DecorologistGuest Blogger: Kristie from The Decorologist
  • Guest Blogger: Jennifer of JWS Interiors/Affordable LuxuryGuest Blogger: Jennifer of JWS Interiors/Affordable Luxury
  • Caitlin Creer InteriorsCaitlin Creer Interiors
  • Cara McBroomCara McBroom

Share this:

  • Click to share on Facebook (Opens in new window) Facebook
  • Click to share on X (Opens in new window) X

See More | Guest Blogger, Living Room, Turquoise and Gray, Turquoise and Green, Uncategorized

« Guest Blogger: Kim of Kim Hoegger Home
Guest Blogger: Cathy of Adore Your Place »

Comments

  1. marissa wade says

    May 9, 2013 at 2:41 pm

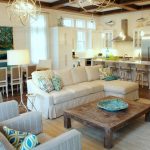
    I love those end tables!! I hope I can come across some like this for my house soon;-) Room is beautiful!

  2. Lisa says

    May 9, 2013 at 5:43 pm

    Helen, You did a great job! I also love the end tables–I've seen them sprayed white and they look good too. Going to check out your blog now πŸ™‚

  3. Seaside Interiors says

    May 9, 2013 at 5:59 pm

    Thanks guys!! Marissa I just spotted the same end tables at Homegoods so they must be making their way around again. Lisa, thanks for popping over and checking out the blog πŸ˜‰

  4. Desiree says

    May 9, 2013 at 8:29 pm

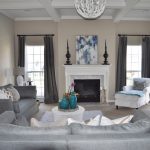
    Beautiful home! Can I ask were the twig wall hangings above the sofa were purchased? Love them.

    Thanks!

  5. theoldfencepost says

    May 9, 2013 at 8:42 pm

    Me too!!! Love the twigs πŸ™‚ I need something light and airy like that! Where in the world did you find those?

  6. Jackie says

    May 9, 2013 at 8:51 pm

    What a beautiful room. Way to go.

    Thanks for sharing.

  7. Seaside Interiors says

    May 9, 2013 at 10:07 pm

    Thanks so much πŸ™‚
    The twigs are bowls that I purchased on zgallerie. It is called the Naples Bowl. Here is the link: http://www.zgallerie.com/p-8900-naples-bowl.aspx. We just hung it with two screws and then touched the top of the screw with a bit of white paint.

  8. carolyn bradford says

    May 10, 2013 at 1:23 am

    What a fun project! It is truly beautiful! I will have to remember you and your husband! We have a home in Sandestin and are always looking for quality people to help in installations, paintings, etc….I would love to be able to call on you! Everything you showed is just wonderful!

  9. Anonymous says

    May 10, 2013 at 8:09 pm

    Love the driftwood art, can you share where you found them at?

  10. Seaside Interiors says

    May 11, 2013 at 4:47 pm

    Thank you Carolyn πŸ™‚

  11. Seaside Interiors says

    May 11, 2013 at 4:48 pm

    The driftwood art is the Naples Bowl from Zgallerie. Here is the link:
    http://www.zgallerie.com/p-8900-naples-bowl.aspx

  12. Casa Vilora Interiors says

    May 13, 2013 at 4:55 am

    Great job! The room is beautiful!

  13. Musette says

    May 14, 2013 at 1:23 pm

    Thanks for sharing! I love that paint color!

    xoA

  14. Kelly says

    May 14, 2013 at 10:18 pm

    Absolutely beautiful! Love it ll especially te curtain panels!! Do you mind telling where ou got them? Thank you!

  15. Seaside Interiors says

    May 15, 2013 at 1:15 am

    A nice surprise to pop in and see such lovely comments. I really appreciate that, thanks guys πŸ™‚

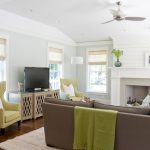
    Kelly, the curtains where purchased from TJMaxx and then I had my mum, (my sewer lady)sew the caramel color to the base. That way I could bring in the semi-custom made feel while still keeping within the client's budget.

  16. Anonymous says

    January 29, 2014 at 3:29 pm

    dark brown sofa? Seaside Interiors?

  17. I like this site :: Penguin Recovery Service says

    August 28, 2014 at 1:01 pm

    What a lovely house!

  18. Carpet Restoration Chicago says

    September 16, 2014 at 4:04 pm

    Great interior in here!

Trackbacks

  1. Transitional Blog says:
    August 9, 2016 at 5:34 am

    Contemporary Requisite Gray Glass

    […] ngs, etc….I would love to be able to call on you! Everything you showed is jus […]

I’m Erin and I am obsessed with the color turquoise. I started this blog to collect inspirational photos I find of fabulous rooms that feature all of the lovely shades of my favorite color. For even more turquoise, visit my shopping blog Everything Turquoise!

Copyright © 2025 · House of Turquoise

Copyright © 2025 Β· Pink Theme on Genesis Framework Β· WordPress Β· Log in